The claims and recommendations in this post are my experiences experimenting with the different software involved over a weekend. I could very well be wrong about multiple things here, and if you feel that I am, don’t be afraid to comment.
Software used:
- Windows 7
- GNS3 1.1
- VMware Workstation 10.0.1
- Virtualbox 4.3.18
- XRv 5.2.0
1. Introduction
Cisco’s XRv is a VM of their IOS XR operating system that can be deployed on x86 systems. Commercially, it’s marketed for use as an out of band route reflector, but for enthusiasts like us, it’s a tool for playing around with XR without needing to rent relatively expensive rack time, or buying routers instead of a new car. It doesn’t have a complete set of feature, and lower layer features that are “closer to the hardware” are less likely to work. An example would be something like VPLS. This thread over at one of Cisco’s forums has more discussion on that issue: https://supportforums.cisco.com/discussion/12101386/xrv-511-workingnon-working-features-and-roadmap
XRv is supposed to be deployed on a bare metal hypervisor which presents a problem for home users like me who only has a single computer with enough RAM. The good news is that it works fine on VMware Workstation. The bad news is that if you don’t read a post like this one, you risk losing a ton of time on solutions that should work, but really don’t. A big problem with XRv is its boot time of 10+ minutes which makes experimenting with different set ups incredibly tedious.
This post will not describe every single detail of these configurations and will instead simply point you in the right direction to avoid the worst pitfalls. If you need more details, I’m sure you can find that elsewhere.
2. What Doesn’t Work
2.1 GNS3 + Virtualbox + XRv
Any kind of integration with GNS3 seems to be broken. What’s worse is that it’s not completely broken, occasionally allowing packets to flow – something that caused me to waste a lot of time on it. The general idea on how to get XRv into GSN3 is:
- Install Virtualbox
- Create one or more XRv VMs in Virtualbox and assign them several network adapters connected to host network adapters.
- Each installed network adapter will map to one out of 4 “physical” interfaces within XRv
- Install GNS3
- Use GNS3’s Virtualbox wrapper feature to import the VM into GNS3.
- Connect the VM to whatever else you have in your GNS3 topology.
The problems are twofold:
- The interface numbers do not properly match up. Meaning, the first physical interface in XRv will not always be interface 1 in GNS3. This wouldn’t necessarily be a problem if it was a consistent offset, but it doesn’t seem to be.
- Worse, when I imported two identical sets of VMs, communication was possible between two of them, but the other two were dead. This is some kind of bug with GNS3, Virtualbox and XRv. This long thread has more details: http://forum.gns3.net/topic8394.html
- The solutions presented in that thread involve things like removing and replacing links between devices, something that you wouldn’t be interested in messing around with when labbing.
2.2 GNS3’s Cloud Feature
The next thing I tried was using GNS3’s cloud feature. For anyone not familiar with GNS3, it essentially allows you to send packets from any network adapter installed on the machine into whatever device you have it connected to in GNS3. It’s great for things like connecting Windows or Linux VMs to your router topology. I had high hopes for this approach because both Virtualbox and VMware Workstation allows you to output traffic from a “vswitch” into a software network adapter installed on the host system. Getting the traffic from the “virtualized” NIC into GNS3 through the cloud feature seems conceptually viable, but I could not get it to work. With Virtualbox I had a similar experience to how Virtualbox behaved with the previously mentioned wrapper feature; it worked, and then it didn’t. VMware Workstation didn’t want to play ball at all.
3. What Actually Works
Using VMware Workstation (VMW), but keeping all traffic within the virtual network of that system seems to work without issues. In other words, your devices will communicate with one another using VMW’s virtual switches, called vmnets. According to VMware, each vmnet is a “virtual switch”, but it’s conceptually more like a virtual hub. When a networking person thinks of a switch they think of a device with ports where each port belongs to certain vlans and that the switch learns the location of MAC addresses connected to other ports that belong to the same vlan, but this doesn’t seem to be how a vmnet work. Instead, it appears that frames are simply copied to all other adapters connected to the same vmnet, irrespective of what vlan-ids you add the the frames.
Normally, a switch would drop frames tagged with a vlan-id if the port expects untagged frames, but a vmnet forwards tagged frames just fine. Another way of thinking about it is that the vmnet is a switch where all ports are trunks with an allowed list of 1-4095. Ultimately, it’s hard to verify any of this beyond simply observing how connected devices behave since you don’t have any visibility into the vmnets. At first glance, this might seem like a bad thing, but it’s actually not since it allows us to create arbitrary topologies with just one vmnet. More on that later.
3.1 Configuring VMW For XRv
3.1.1 Creating the VM
Creating an XRv VM just involves adding a new VM with the XRv .vmdk as the harddrive. It’s supposed to have 3 GB of RAM, but I’ve heard that you can get away with less. Downloading the XRv files through Cisco’s normal software channels requires an account with certain credentials, however, using this link: https://upload.cisco.com/cgi-bin/swc/fileexg/main.cgi?CONTYPES=Cisco-IOS-XRv allows a normal user like me to download it. Presumably, this discrepancy is a mistake, but who knows.
3.1.2 Getting Console Access
After successfully creating your VM and booting it, you’ll eventually end up with a blank screen. It’s easy to think that you’ve broken something, but that’s not the case. The router console output is just not displayed in the standard VM display output. To fix this you need to use something called a serial named pipe. To get console access you need to add a serial port to the VM and set it as named pipe:

If you are like me, you’ve never heard of a named pipe before. What is it? It’s basically a way to copy (or “pipe”) any input/output to and from the virtual machine’s serial port from the host system.
To interface with the named pipe via telnet, we need to use a tool called Named Pipe TCP Proxy found here: http://shvechkov.tripod.com/nptp.html. After installation it should be self-explanatory how to add a named pipe and map it to a port on the localhost. Just note that you need to start the program as administrator for it to be able to save settings.
At this point you should have console access to your XRv VMs,
3.1.3 Network Adapters
At this point your XRv VM will not have any external facing interfaces because you haven’t properly enabled any vNICs for it. The first network adapter added to the VM will always be the management interface, and any subsequent adapters will map to Ethernet interfaces on the XRv. This image, which I’ve borrowed from Cisco’s XRv configuration guide, illustrates this:
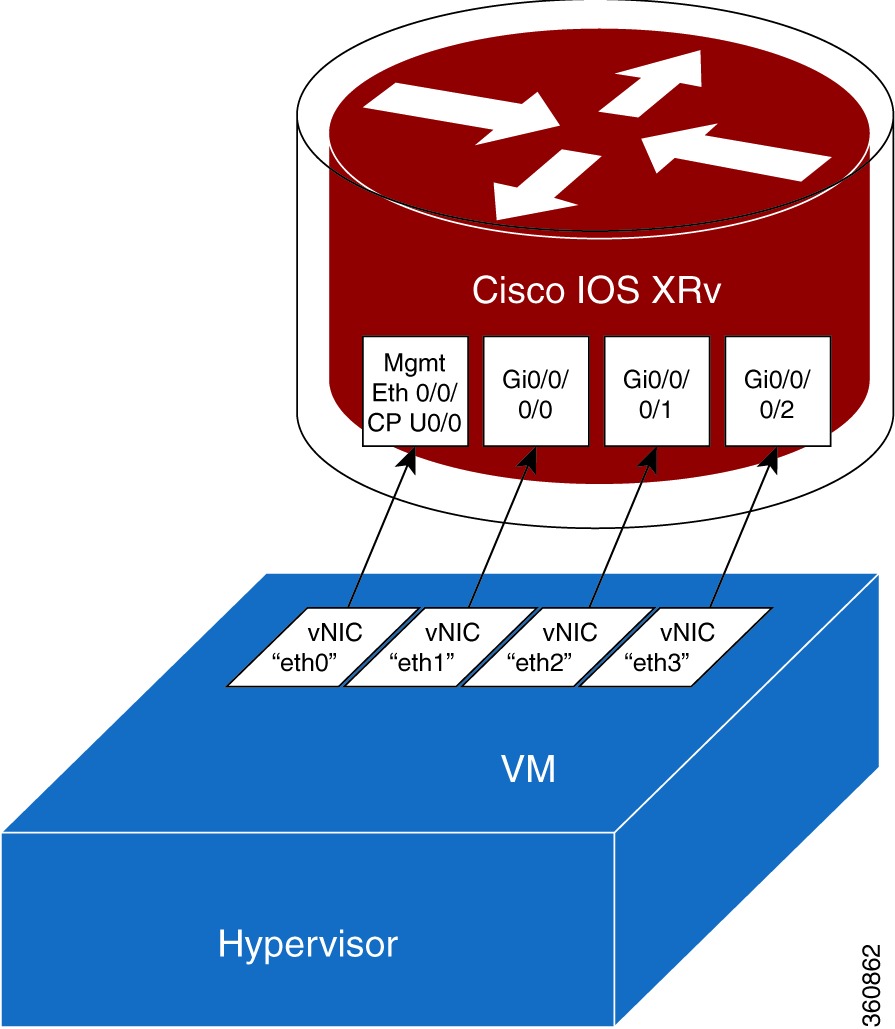
We will not be using the mgmt interface since we have our named pipes for console, but we do need at least 1 Ethernet interface. The minimum is thus 2 network adapters on the VM to get access to the first gig0/0/0/0 interface. According to the configuration guide, XRv supports up to 128 interfaces.
3.1.4 Editing the .vmx file
Just adding the network adapters to the VM will not work since they, by default, will be of the wrong “type”. XRv wants the “e1000” type, and this must be manually edited in the VM configuration file since there’s no option in the Workstation GUI. Find the .vmx file and open it with a text editor. You should see something similar to this:
[…]
ethernet0.present = “TRUE”
ethernet0.connectionType = “custom”
[…]
Add the line ethernet0.virtualDev = “e1000” after ethernet0.present:
[…]
ethernet0.present = “TRUE”
ethernet0.virtualDev = “e1000”
ethernet0.connectionType = “custom”
[…]
Do this for all adapters that you’ve added to the VM and they should show up as external facing interfaces in XRv.
4. Networking
You could create a network by adding several interfaces to each VM and connect them to different vmnets to create a topology. This is quite inefficient however since creating a new logical topology would involve reconfiguration of the vmnets. It’s easier to connect one interface from each XRv to the same vmnet and rely on dot1q subinterfaces to create the logical topology.

Creating any arbitrary connection now just involves adding a dot1q subinterface on the two devices in question.
5. Conclusions
I hope that this post has been helpful and that I haven’t left out any key piece of information. Good luck!

Hello – this is a very good and detailed explanation.
However, I am struggling with the second instance of the XRv – I cannot telnet into it. Any ideas?
I have one working XRv instance on VMware that works fine.
However, when trying to add a second XRv instance, and trying to add the serial on the .vmx file with an available TCP port (different than the one used on the first XRv instance), like this
serial0.present = “TRUE”
serial0.yieldOnMsrRead = “TRUE”
serial0.fileType = “network”
serial0.fileName = “telnet://127.0.0.1:52153”
…It boots but I cannot telnet into it. It stays on the “press any key” screen.
Any ideas on how to add a second XVr instance in VMWare?
I’m not sure, but this is how the config for my serial ports look in the .vmx files:
serial0.present = “TRUE”
serial0.fileType = “pipe”
serial0.fileName = “\\.\pipe\xr1”
serial0.tryNoRxLoss = “TRUE”
All VMs have identical serial config except that the fileName is different (all config is identical except the MAC addresses on the NICs and the serial filename – you just full clone the VM and then change the MAC and the serial name). I then use the Named Pipe TCP Proxy tool (linked in the post) to map between each named pipe and a port on the local host.
This is what the Named Pipe TCP Proxy looks like:
To reach any of these VMs I just telnet to 127.0.0.1:6001, 127.0.0.1:6002, etc. Note here that Named Pipe TCP Proxy must be running at the same time as the VMs for this to work.
There are possibly other ways to interface with the console, but I’m not particularly skilled in this area. It’s plausible that you could get Workstation to pipe the serial directly to the localhost on the host OS without using the extra utility, but it’s not something that I’m familiar with.